Most powder capsule filling machine problems trace to five root-cause families: powder behavior (density or moisture change → weight variation), vacuum (low pressure → separation failures), capsule quality (dimensional variance → feeding faults and damage), settings (tamping depth, locking force, speed), and wear (pins, springs, seals). The professional diagnostic sequence is always the same: weigh twenty consecutive capsules, check powder bed height and vacuum gauge, ask what changed since the last good batch — then adjust one variable at a time. On a well-maintained machine like the HIJ NJP-800C, nine out of ten production problems resolve at the process level without any mechanical repair.
- Diagnose in order of likelihood: powder first, settings second, wear parts third, mechanical faults last — the reverse order wastes shifts.
- Twenty consecutive capsule weights distinguish random variation (powder/flow) from patterned variation (a specific bore or station) in five minutes.
- Change one variable per test run. Operators who adjust three things at once fix problems without learning which fix worked — and can’t prevent recurrence.
- A written “last known good” settings sheet per product is the cheapest troubleshooting tool a plant can own.
This is the operations companion to our cluster: written for the production supervisor at 2 a.m., not the buyer at the trade show. Each of the nine problems below follows the same structure — symptom, root causes ranked by real-world frequency, and the fix sequence. Mechanical background lives in the working-principle guide; powder science lives in the flowability guide. Bookmark all three.
The First Five Minutes: A Standard Diagnostic Routine
Before touching any setting, run this sequence and write down the results: (1) weigh twenty consecutive capsules and note whether deviation is random or patterned; (2) read the vacuum gauge against your OQ baseline; (3) check powder bed height and hopper levels; (4) pull the reject chute and inspect what’s being rejected; (5) ask the only question that solves half of all cases — what changed? New powder lot, new capsule lot, new operator, humidity swing, recent cleaning? A problem that appeared with a change is that change until proven otherwise.
The Nine Problems, Ranked by Frequency
Fill Weight Variation or Drift
Symptom: Individual weights scatter beyond tolerance, or the batch average walks steadily up or down through the shift.
Root causes (in order): New powder lot with different bulk density; powder bed running low; humidity change altering flow (hygroscopic blends); segregation in a wide particle-size blend; loose or worn tamping pins on one station; dosing disc bore wear (old machines).
Fix sequence: Random scatter → treat as powder: verify bed height, check the new-lot density against your reference, control room RH to 45–55%. Steady drift → moisture or bed height. Patterned deviation (every Nth capsule) → inspect that bore’s tamping pins and springs. Only after powder and pins are ruled out, adjust tamping depth to re-center — and log the change.
Capsules Not Separating
Symptom: Rising count of unseparated capsules in the reject chute; hourly output drops though the machine runs at speed.
Root causes: Vacuum below range (filter clogged, pump wear, line leak); capsule lot with tight caps or out-of-spec dimensions; capsules too dry and brittle (storage below ~35% RH); worn segment bores gripping bodies unevenly.
Fix sequence: Gauge first — restore vacuum to the −0.02 to −0.06 MPa window (clean filter, check line). If vacuum is in range, swap to a retained sample of a known-good capsule lot and re-test: separation recovering means a capsule quality conversation with your shell supplier, not a machine problem.
Capsule Feeding Faults and Jams
Symptom: Empty stations, capsules inverted in bores, or repeated stoppages at the feeding magazine.
Root causes: Capsule dimensional variance or static; humidity extremes (sticky when damp, brittle when dry); foreign capsules or debris in the hopper; orientation rail misalignment after cleaning reassembly.
Fix sequence: Empty the hopper and inspect the capsule lot; condition capsules at 35–65% RH before running; verify rail alignment against the manual’s datum marks after every reassembly — the majority of “sudden” feeding faults follow a cleaning teardown.
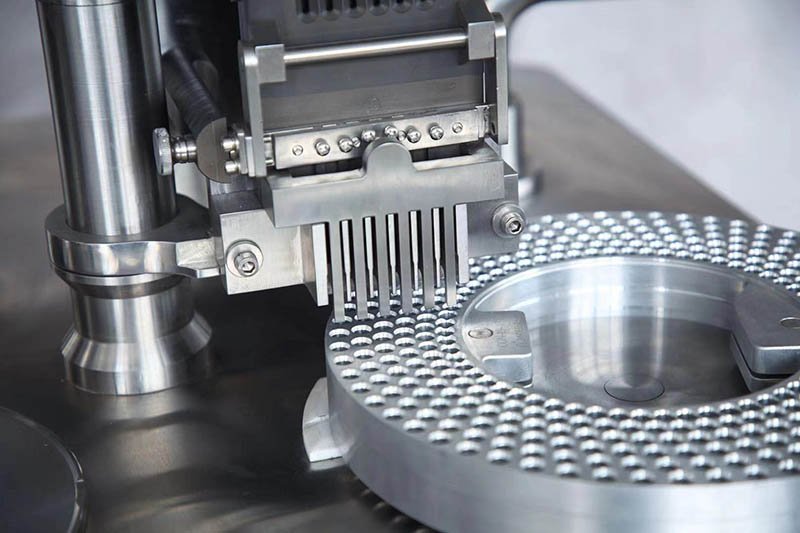
Feeding faults cluster after cleaning teardowns: rail alignment against datum marks is the first post-reassembly check.
Capsule Damage: Dents, Splits, Telescoping
Symptom: Visible defects on finished capsules — dented domes, split rims, or caps riding up the body (“telescoping”).
Root causes: Locking force set too high (splits) or misaligned segments (dents); brittle capsules from dry storage; damaged or burred segment bores; closed-length setting wrong for the capsule brand in use.
Fix sequence: Measure ten locked capsules against the shell manufacturer’s specified closed length and reset locking depth; inspect segment bores under light for burrs (dress or replace); condition capsule storage humidity. Note that different capsule brands in the same nominal size can need different locking settings — another line for the settings sheet.
Incomplete Fills: Slug Breaking During Transfer
Symptom: Weights low and erratic; loose powder visible around the transfer station; capsules with partial fills.
Root causes: Powder too free-flowing to hold a slug (over-granulated or high glidant); tamping depth too shallow; transfer pins worn or sticking; disc-to-segment alignment off after disc change.
Fix sequence: Increase tamping depth incrementally to build slug cohesion; verify disc installation and alignment; if the formulation changed recently, revisit glidant level — flow can be too good for a tamping system, the counterintuitive case covered in the flowability guide.
Loose Caps: Capsules Opening Downstream
Symptom: Capsules open in the polisher, counter, or blister feed; powder contamination downstream.
Root causes: Locking force too low; closed length set long; capsule lot with weak locking rings; overfilled capsules preventing full closure.
Fix sequence: Confirm fill weight isn’t mechanically overfilling the body volume; reset closed length to shell spec; increase locking force in small steps while checking for splits (problems 4 and 6 are the two ends of one adjustment).
Powder Leakage and Excess Dust
Symptom: Powder accumulating on machine surfaces, in the enclosure, or on capsule exteriors; dust collector filling fast.
Root causes: Worn dosing station seals; scraper blade gap too wide; dust collection airflow degraded (full bag, blocked line); very fine formulation exceeding standard sealing.
Fix sequence: Service the dust collector first (it masks every other cause when saturated); replace station seals per the wear schedule; reset scraper clearance. Persistent dusting on capsule exteriors also inflates polisher load and can carry powder into the locking area — treat it as a process defect, not housekeeping.
High Rejection Rate With Normal Settings
Symptom: Reject percentage climbs above your OQ baseline though weights and separation look normal.
Root causes: Sensor drift or dusty sensor windows; capsule lot variance triggering marginal detections; genuine rise in unseparated capsules hidden by averaging.
Fix sequence: Clean sensor windows (thirty seconds, fixes more than anyone admits); audit the reject chute contents — if rejects are actually good capsules, recalibrate detection; if genuinely defective, return to problem 2. Never respond by loosening rejection sensitivity to “fix” the number: that ships the defects instead.
Weights Pass, Dissolution Fails
Symptom: QC weight checks fine; dissolution or disintegration results slow at release testing.
Root causes: Tamping depth increased over time to chase weight stability, over-compacting slugs; lubricant (magnesium stearate) over-blended upstream; formulation change unreported to the encapsulation team.
Fix sequence: Compare current tamping settings against the validated baseline from your PQ — creeping compaction is invisible day to day and obvious against the record; reduce depth stepwise and re-test both weight and dissolution. Settings drifting from validated baselines is also a change-control event, as covered in the validation guide.
Preventive Maintenance: The Schedule That Prevents the List Above
| Interval | Tasks |
|---|---|
| Every shift | Weigh-check sampling; vacuum gauge reading; sensor window wipe; reject chute audit; dust collector level |
| Weekly | Clean orientation rails and magazine; inspect tamping pins for free movement; check scraper clearance; verify oil level in cam lubrication reservoir |
| Monthly | Inspect station seals; check segment bores for burrs; verify locking depth against spec; test all interlocks and low-level pauses |
| Quarterly | Replace vacuum filter; inspect springs and transfer pins; audit settings sheets against validated baselines |
| Annually | Full wear-part review (pins, springs, seals) from the spares kit; bearing and cam inspection; requalification review per change control |
Machines maintained on this cadence rarely produce the emergency version of problems 1–9; they produce the early-warning version, caught at a shift check. The spare parts to support the schedule ship in the first-year kit included with every NJP-800C.
When to Stop and Call the Factory
Escalate rather than improvise when: deviation is patterned to specific stations and pin/spring replacement doesn’t clear it (possible cam or turret issue); any unusual mechanical noise or heat from the drive; electrical faults beyond fuse replacement; or any repair requiring drive-train disassembly. Video-call diagnosis with the factory engineer — machine running, camera on the station in question — resolves most escalations without a site visit, and it’s a service HIJ provides for the machine’s lifetime, not just the warranty year.
Of all the remote diagnoses I’ve done over the years, the two most common endings are almost embarrassing: a dusty sensor window, and a setting someone changed months ago that nobody wrote down. Which is why the best-run plants I visit share one habit — a laminated settings sheet per product, hanging on the machine, updated under signature. Tamping depths, locking depth, speed, vacuum reading, capsule brand. When trouble starts, they compare against the sheet before touching anything, and half their “machine problems” dissolve into “someone’s undocumented adjustment.”
The other habit worth stealing: keep the FAT and PQ weight printouts taped inside the settings binder. That’s what “normal” looks like for your powder on your machine. Troubleshooting without a baseline isn’t diagnosis — it’s guessing with confidence.
Frequently Asked Questions
Why does fill weight drift over the course of a shift?
Gradual one-direction drift almost always tracks an environmental or material variable, not mechanical wear: powder bed height slowly dropping as the hopper empties, humidity rising through the day and changing powder density, or a hygroscopic blend absorbing moisture in the open hopper. Check bed height management and room RH first. Mechanical causes (loosening pins) produce patterned or step changes, not smooth drift.
How often should tamping pins and springs be replaced?
Inspect weekly for free movement and visible wear; replace on condition rather than a fixed calendar. Under single-shift operation with non-abrasive powders, pins and springs commonly serve twelve months or more; abrasive mineral formulations shorten that considerably. The practical trigger is a specific bore producing patterned weight deviation that pin cleaning doesn’t clear — replace that station’s pins and springs as a set from your spares kit.
Our separation rate dropped suddenly — machine or capsules?
A two-step test answers it in fifteen minutes. First read the vacuum gauge: below your OQ baseline means machine side — clean the filter, check for line leaks, service the pump. If vacuum is in range, run a retained sample from a previous known-good capsule lot: separation recovering to normal means the new capsule lot is the cause (tight caps or dimensional variance), and the evidence supports a supplier claim. Sudden changes are almost never wear, which degrades gradually.
What causes black specks or contamination in filled capsules?
Work through the sources in order: raw material (sieve-check the powder lot and review the supplier CoA), environment (open transfers, dusty dust-collector handling), and machine (over-lubrication migrating past seals, or metal wear — inspect scraper contact and any aluminum-on-steel rubbing points). Persistent metallic specks justify an inline metal detector if you don’t run one, and warrant checking cam lubrication isn’t over-filled and weeping onto product paths.
When should we attempt repairs in-house versus calling the manufacturer?
In-house scope covers everything designed as operator-serviceable: wear parts (pins, springs, seals, filters), settings, sensors, cleaning-related reassembly, and fuse-level electrical items — all supported by the spares kit and manual. Escalate to the factory for anything involving the cam mechanism, turret, drive train, or persistent faults that survive wear-part replacement. A live video call with the machine running is the right first escalation: most factory-level diagnoses conclude with guided in-house fixes rather than site visits.
HIJ Machinery (legal name: Wenzhou Trustar Machinery Technology Co., Ltd) is a pharmaceutical packaging machinery manufacturer founded in 2004 in Rui’an, Wenzhou, Zhejiang, China, serving B2B customers in more than 30 countries with lifetime maintenance support and video-call diagnostics on every machine. Equipment is CE-marked, built to ISO 9001 manufacturing standard, and designed cGMP-ready.
This article was written and reviewed by Forester Xiang, Founder & Chief Engineer of HIJ Machinery, based on 20+ years of encapsulation engineering experience and 100+ pharmaceutical facility audits.
Send the symptom, twenty consecutive capsule weights, and a short video of the station — our engineers diagnose by video call, free, whether or not the machine is ours.
Get Free Video Diagnosis